How to start a Self Hosted Wordpress Blog – Step by Step Guide for Beginner (Free)
When we think to setting up a Blog or website the first thing that comes into mind is coding and if you're not a technical guy and don't know about coding then you may think that setup website is not possible. This mythology is totally wrong today. As we live in Era of Technology and there are a lots of tools and services are available through which you can setup a blog or website with zero coding from you.
The good thing is that even if you are not techy and don't know coding you can think and set up your own blog by yourself. Are you looking to make a money making blog? Want to start a blog and get paid by blogging? You have landed on the right page, after going through this guide you will definitely be able to setup a blog by yourself.
Before going to start, I want to recommend you to read this post :
Read: Everything you should know about Blog and Blogging.
In this era of technology nothing is better than following your passion and earning passive income via this. So start your new journey.
What do we need to build a Blog?
How to find and register a domain name for free?
Check the availability of your domain name : Enter your domain name in box below and click on check availability.
If your domain name is available, you will see this message : Get it FREE with a new hosting account at Bluehost. Click on Next button and you will be redirected to Bluehost Website where you will be asked to provide your account information (such as name, address, email, etc), package information.
Scroll down and you will see the optional extras packages that you can purchase. It is recommended to un-check all of them, because if you decide that you need them you can purchase them later.
Next, provide your payment details and click on Submit button to complete the sign-up and purchase process.
After completing sign-up and purchase, you will receive an email with your login details. Login to your web hosting control panel which is called cPanel, a dashboard where you can manage everything.
Next, Install WordPress
In your dashboard you can see a lots of icons simply ignore them. Scroll down to the website section and then click on the WordPress icon. You can see Bluehost Marketplace Quick Install screen for WordPress. Click on the ‘Get Started’ button to continue.
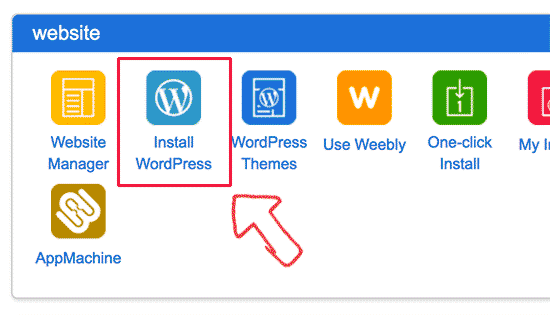
Next, you will be asked to select your domain name. Choose your domain from the drop down field and then click Next. You will also asked to enter your website name, admin username, and a password for your website which can be changed later in WordPress settings.
Next, Check all the check boxes on the screen and then click on the ‘Install’ button to continue. Quick Install will now start installing WordPress on your website. Once the installation is over, a success message will be displayed like this

Next, click on the Installation Complete link.You have successfully created your Self Hosted WordPress Blog Congratulations!
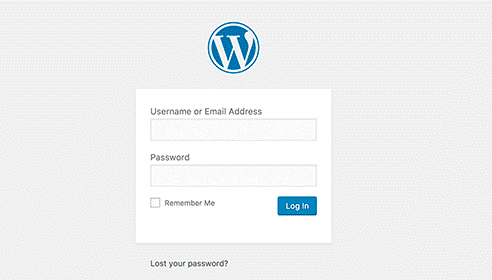
Now you can login to your WordPress site using the admin user-name and password you have entered earlier. You can login with the login URL like this :
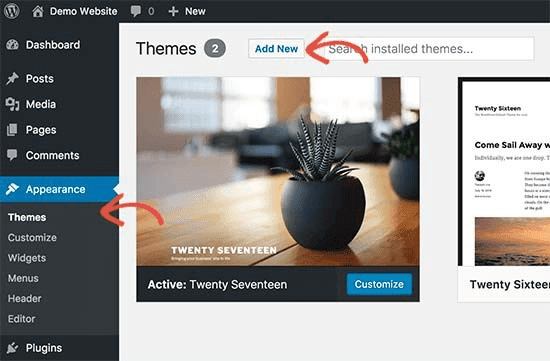
You can change your theme from the WordPress admin dashboard by visiting Appearance » Themes page and then click on the ‘Add New’ button.
You don’t need to finalize all theme settings right now. You can see the demo of your website. Don't worry about the looks of your website, as after adding the contents in your website you will be able to customize it much better.
Posts are part of blog and appear in reverse-chronological order (newer items displayed first) and Pages are static type content such as about page, contact us page, privacy policy, etc.
Plugin can be installed by going to Plugin » Add New in WordPress admin area, search the plugin by name and click on Install or Activate.
So, It depends on the niche of your Blog. Choosing Affiliate marketing in a niche based Blog is good. Niche means the topic of your Blog. If your Blog is about an particular topic then affiliate marketing is good for you. For example, you write about the fashion, then promoting and recommending the fashion related products on your blog will grab the attention of your reader.
But if your blog is a multi niche then affiliate marketing may be not so good for you, means you can not convert visitors to buyers. In this type of website CPC and APM based advertising is good like AdSense. For example, the blog you are reading now i..e improving knowledge is a multi niche where articles are from different topics. I have tried affiliate marketing in this blog but that not make good money. As you can see my blog is monetized with AdSense which is making good money.
So let me make it even easier :
The good thing is that even if you are not techy and don't know coding you can think and set up your own blog by yourself. Are you looking to make a money making blog? Want to start a blog and get paid by blogging? You have landed on the right page, after going through this guide you will definitely be able to setup a blog by yourself.
Before going to start, I want to recommend you to read this post :
Read: Everything you should know about Blog and Blogging.

In this era of technology nothing is better than following your passion and earning passive income via this. So start your new journey.
What do we need to build a Blog?
- A domain name i.e. address of your blog / website.
- WordPress hosting where your blog contents will be stored.
- Your attention on this guide.
- Step 1 : Pick the blog topic and domain name.
- Step 2 : Setup of Domain Name, Hosting Service and Wordpress :
- Pick a domain name and hosting for your blog.
- How to find and register a domain name for free?
- Install WordPress.
- Step 3 : Setup the design of the blog. Select Theme to change your site’s design.
- Step 4 : Add Content to Your Site. Write your first blog post.
- Step 5 : Install the basic and necessary WordPress plugins.
- Step 6 : Share your writeup with the world for getting traffic to your blog.
- Step 7 : Monetize your blog to make money.
Step 1 : Pick the blog topic.
Step 2 : Setup of Domain Name, Hosting Service and Wordpress :
After picking up the topic, the next step is to choose the domain name which can describe your topic. While choosing domain name it is to recommended that choose a .com domain which can easily be pronounced and remembered.How to find and register a domain name for free?
Check the availability of your domain name : Enter your domain name in box below and click on check availability.
If your domain name is available, you will see this message : Get it FREE with a new hosting account at Bluehost. Click on Next button and you will be redirected to Bluehost Website where you will be asked to provide your account information (such as name, address, email, etc), package information.
Scroll down and you will see the optional extras packages that you can purchase. It is recommended to un-check all of them, because if you decide that you need them you can purchase them later.
Next, provide your payment details and click on Submit button to complete the sign-up and purchase process.
After completing sign-up and purchase, you will receive an email with your login details. Login to your web hosting control panel which is called cPanel, a dashboard where you can manage everything.
Why bluehost ?
- Powering Over 2 Million Websites Worldwide
- WordPress Made Easy : #1 recommended web hosting by WordPress.org. Enjoy hassle-free WordPress installation on all accounts.
- 24/7 Support : Trained, in-house experts are here to help 24/7, robust help center includes guides, video tutorials and more.
- Money-back Guarantee : Try and love, or get a refund within 30 days of signing up.
- Free SSL Certificate Included : Every website hosted at Bluehost is given a free SSL certificate which protects your website visitors with one click.
Next, Install WordPress
In your dashboard you can see a lots of icons simply ignore them. Scroll down to the website section and then click on the WordPress icon. You can see Bluehost Marketplace Quick Install screen for WordPress. Click on the ‘Get Started’ button to continue.

Next, you will be asked to select your domain name. Choose your domain from the drop down field and then click Next. You will also asked to enter your website name, admin username, and a password for your website which can be changed later in WordPress settings.
Next, Check all the check boxes on the screen and then click on the ‘Install’ button to continue. Quick Install will now start installing WordPress on your website. Once the installation is over, a success message will be displayed like this

Next, click on the Installation Complete link.You have successfully created your Self Hosted WordPress Blog Congratulations!
Now you can login to your WordPress site using the admin user-name and password you have entered earlier. You can login with the login URL like this :
www.YourBlogName.com/wp-admin

Step 3 : Setup the design of the blog. Select Theme to change your site’s design.
The theme ensures that how your site looks on the front-end, i.e. what a visitor sees when they visit to your site on the web. A WordPress theme changes the design of your website, often including its layout. There are thousands of free WordPress themes are available for the beginner you can also purchase the premium theme of wordpress later.You can change your theme from the WordPress admin dashboard by visiting Appearance » Themes page and then click on the ‘Add New’ button.

You don’t need to finalize all theme settings right now. You can see the demo of your website. Don't worry about the looks of your website, as after adding the contents in your website you will be able to customize it much better.
Step 4 : Add Content to Your Site. Write your first blog post.
There are two type of contents can be added in wordpress Posts and Pages.Posts are part of blog and appear in reverse-chronological order (newer items displayed first) and Pages are static type content such as about page, contact us page, privacy policy, etc.
Pages can be added by going to Pages » Add New page in WordPress admin area. Provide a title for page, add content (text, links, images, embed videos, audio, etc) in the text editor and click on the publish button to make it live on website.
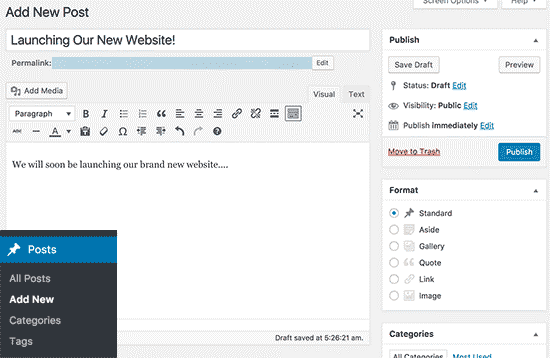
Now, go to Posts » Add New in WordPress admin area, and this screen will be seen.

Accordingly, add a title of post and content in the post editor. You can define the Categories and Tags for your blog post. For example I wrote this Post under Blogging Category with tag Blogging.
Next, click on the publish button to make it visible on site.
Step 5 : Install the basic and necessary WordPress plugins.
There are thousands of Plugin is available on wordpree but some of basic and necessary plugin must be installed, like WordPress SEO by Yoast and WP Super Cache (for Optimization). For Security of website install Updraft Plus and Sucuri.Plugin can be installed by going to Plugin » Add New in WordPress admin area, search the plugin by name and click on Install or Activate.
Step 6 : Share your writeup with the world for getting traffic to your blog.
This step is most important for new website. Share your blog post to the different social network and make the world know about your writeup. I personally recommend to use Quora for answering the questions which are related to your blog post with link of your post. This is the best way to get traffic to your newly created blog.Step 7 : Monetize your blog to make money.
This is the last step, monetize our blog once you have good number of posts and visitors through following monetization techniques :- CPC, CPM based advertisements like Adsense.
- Affiliate marketing. One of the most popular methods for monetizing a blog. Affiliate marketing is to promote the product in your website and if someone buy the product through your promoted link then you will get some percentage of sell amount as commission.
So, It depends on the niche of your Blog. Choosing Affiliate marketing in a niche based Blog is good. Niche means the topic of your Blog. If your Blog is about an particular topic then affiliate marketing is good for you. For example, you write about the fashion, then promoting and recommending the fashion related products on your blog will grab the attention of your reader.
But if your blog is a multi niche then affiliate marketing may be not so good for you, means you can not convert visitors to buyers. In this type of website CPC and APM based advertising is good like AdSense. For example, the blog you are reading now i..e improving knowledge is a multi niche where articles are from different topics. I have tried affiliate marketing in this blog but that not make good money. As you can see my blog is monetized with AdSense which is making good money.
Final Thoughts / Conclusion
There's a lot of content in this guide. Maybe you feel a bit overwhelmed.So let me make it even easier :
- Come up with a good topic and name for your blog or website.
- Take 10 minutes and make good use of the special deal from Bluehost. Sign up and get a 50% discount on your web hosting plus a free domain name.
- Bookmark this page and go through each steps and apply them one by one.


No comments: